Smart VPS monitoring with NetData and Docker

Welcome to the sixth page of our handbook on self-hosting. Begin here. Read the previous page here. On this page, we’ll cover self-hosting NetData with Docker (docker-compose
, more specifically) on top of the stack we’ve built on previous pages.
Topics covered on this page
- Why is monitoring a VPS important?
- The benefits of using NetData on your VPS
- What to add to your docker-compose.yml file
- Showing Docker container names in NetData
Why monitor a VPS?
This is a difficult question to answer in a relatively short period of time—I want to get you straight into the process of installing it on your VPS. I’m going to dedicate an entire post to the importance of VPS monitoring soon, so stay tuned for that.
In short, monitoring a VPS empowers you in a few key ways:
- Discover which, if any, processes are consuming too many resources, thereby affecting the rest of your experience
- Ensure all your services are running as expected…
- … and know ASAP when they’re not via alerts
Your VPS use case helps dictates just how vital a robust monitoring solution is, but so does personal preference. If you’re the only one using your self-hosted services, it might be less of a priority than if you’re self-hosting your business’ website or app, or have other developers collaborating on code via a private Gitea installation, for example.
My self-hosted stack is for personal use only, and nothing is too critical to my day-to-day computing life, but I do choose to implement some monitoring to make troubleshooting easier.
What's the BEST DEAL in cloud hosting?
Develop at hyperspeed with a Performance VPS from SSD Nodes. We DOUBLED the amount of blazing-fast NVMe storage on our most popular plan and beefed up the CPU offering on these plans. There's nothing else like it on the market, at least not at these prices.
Score a 16GB Performance VPS with 160GB of NVMe storage for just $99/year for a limited time!
The benefits of using NetData on your VPS
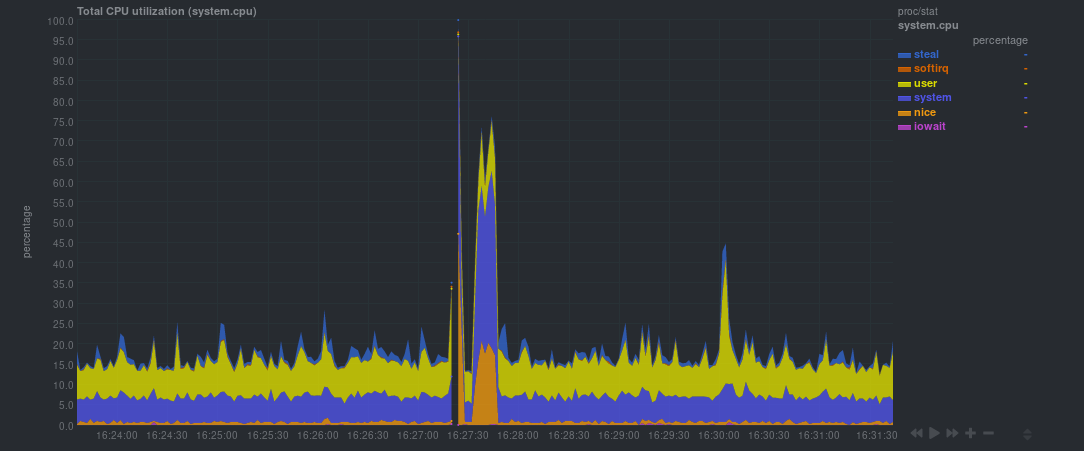
Long ago, as I was searching for alternatives to NewRelic for monitoring, I came across NetData and was impressed by not only its looks, but also the extensiveness of its analysis.
Let’s give NetData’s developers a moment to explain themselves:
Unparalleled insights, in real-time, of everything happening on your systems and applications, with stunning, interactive web dashboards and powerful performance and health alarms. Analyze thousands of metrics per server. Everything about the system (CPU, RAM, disks, network, firewall, QoS, NFS, ZFS, etc). Detailed performance metrics for dozens of applications (such as web servers, databases servers, email servers, DNS servers, etc). Visualize metrics collected from SNMP devices, and APM metrics via the embedded statsd server.
Sounds pretty good, right?
It’s important to note that NetData only shows real-time data, not historical data. NetData is excellent for alerts and seeing the health of your VPS right now, but not built to figure out why a specific process crashed last week.
What to add to your docker-compose.yml file
Deploying NetData with docker-compose
is simple and requires almost no customization.
As always, replace the EMAIL
, DOMAIN
, and TLD
variables in the following code with your values.
netdata:
image: firehol/netdata
container_name: netdata
hostname: monitor.DOMAIN.TLD
ports:
- 19999:19999
cap_add:
- SYS_PTRACE
security_opt:
- apparmor:unconfined
volumes:
- /proc:/host/proc:ro
- /sys:/host/sys:ro
- /var/run/docker.sock:/var/run/docker.sock:ro
environment:
- VIRTUAL_HOST=monitor.DOMAIN.TLD
- LETSENCRYPT_HOST=monitor.DOMAIN.TLD
- [email protected]
You can now run docker-compose up -d
and wait a moment as the NetData image is downloaded and launched as a container. Visit monitor.DOMAIN.TLD
in your browser and see your data start to flow!
Showing Docker container names in NetData
When I first launched NetData, I noticed that while I could view the resource usage and status of every Docker container in my self-hosted stack, they were referred to only as their IDs, not their names. Maybe you’ve memorized that ed2fd5fe702f
equals your NextCloud installation, but I need a little more help.
NetData’s installation instructions have a solution. When you first installed Docker, you likely created a group for Docker users and added your user to it. That group has a PGID
, and if you let NetData know which PGID
to look at, it can convert those IDs into the names you specified.
Just run the following command to find your PGID
:
grep docker /etc/group | cut -d ':' -f 3
My Docker PGID
is 999
, so I added the following as another environment variable: - PGID=999
. I then ran docker-compose up -d
again to recreate the NetData container with this PGID
environment variable enabled, which allows NetData to display the container names for easy monitoring of individual containers.
Taking NetData a step further with Pushbullet notifications
Head on over to Pushbullet and create an account if you don’t have one. Once created, head to Settings -> Account
and create a new Access Token. Keep this code safe.
Log into your VPS if you’re not already, and navigate to whichever folder you keep your docker-compose.yml
file in.
Now, there are lots of ways to edit a file within a running container, but I like what I call the copy-out-copy-in method. First, copy the /etc/netdata/health_alarm_notify.conf
from within the NetData container into your current folder.
$ docker cp netdata:/etc/netdata/health_alarm_notify.conf .
You can then edit the health_alarm_notify.conf
file with your editor of choice. Navigate down to the section, which looks like the following:
#------------------------------------------------------------------------------
# pushbullet (pushbullet.com) push notification options
# multiple recipients can be given like this:
# "[email protected] [email protected]"
# enable/disable sending pushbullet notifications
SEND_PUSHBULLET="YES"
# Signup and Login to pushbullet.com
# To get your Access Token, go to https://www.pushbullet.com/#settings/account
# Create a new access token and paste it below.
# Then just set the recipients' emails.
# Please note that the if the email in the DEFAULT_RECIPIENT_PUSHBULLET does
# not have a pushbullet account, the pushbullet service will send an email
# to that address instead.
# Without an access token, netdata cannot send pushbullet notifications.
PUSHBULLET_ACCESS_TOKEN=""
DEFAULT_RECIPIENT_PUSHBULLET=""
# Device iden of the sending device. Optional.
PUSHBULLET_SOURCE_DEVICE=""
In the PUSHBULLET_ACCESS_TOKEN
area, copy the access token you just created on the Pushbullet dashboard.
For the DEFAULT_RECIPIENT_PUSHBULLET
field, add any accounts where you would like to receive an email notification for your alarms. If you add the email you used to create your Pushbullet account you should get a push notification, whereas other email accounts will get an email notification.
Time to copy the .conf
file back into the container and restart the NetData container to reload the configuration changes.
$ docker cp health_alarm_notify.conf netdata:/etc/netdata/health_alarm_notify.conf
$ docker restart netdata
You should get a push notification and/or an email if a NetData alarm is triggered! NetData can send notifications to far more services in complex configurations, so you should check out the health monitoring documentation for more. You may also want to read up on creating your own alarms depending on your particular configurations.
Monitoring your self-hosted stack is important, and NetData is just the first piece of a complex puzzle. More self-hosting to come soon!
Bookmark this guide and follow us on Twitter or Mastodon to get updates. Or, you can subscribe to the weekly Serverwise newsletter, where I’ll let you know as soon as this guide expands.
[cta]Table of contents
-
Self-hosting with Docker: The definitive handbook
-
Self-Hosting Handbook: A Docker-Compose Tutorial
-
Using docker-compose to add web apps: The self-hosting handbook
-
Self-hosting administration: The self-hosting handbook
-
Self-Hosting Nextcloud with Docker: Self-hosting handbook
-
Smart VPS monitoring with NetData and Docker
-
Docker Networking — Done the Right way!
Like what you saw? Subscribe to our weekly newsletter.