
You’re minding your own business, clicking through the repositories in a prominent developer’s GitHub profile, when you stumble across one called dotfiles. Curious, you click through. What’s this? A bunch of configuration files? “What’s .xinitrc?” you ask yourself aloud. “Why, exactly, are people putting their .vimrc files into version control, and then sharing them with everyone?”
These dotfiles aren’t just posturing, and they aren’t frivolous—for many, they’re essential to productive code development or administration in the terminal. And, if you take the time to set up a system for keeping and deploying them, you can instantaneously deploy a familiar desktop environment just about anywhere.
What’s a dotfile, exactly?
A dotfile is a configuration file, in plain text, with a name that begins with a full stop (.), or a dot. On Unix systems, the full stop hides the file when executing ls or when browsing using a file manager like Finder. Dotfiles thus remain hidden during typical use but can be exploited by power users to extraordinary ends.
Because dotfiles are written in plain text, they’re easily transferable between different machines, even those running completely different operating systems. As long as your operating system has git, for example, you can configure it using .gitconfig.
Traditionally, dotfiles only work on Unix-based systems—that is, macOS, Linux, and *BSD variants, plus others—and that’s the focus of this guide. Windows users using Cygwin or the Windows Subsystem for Linux may have some luck, but setup will be for you to figure out.
Why should I care about these random configuration files?
You probably have a handful of preferences when working on development or administration projects. Maybe you like vim just so, or only like one specific SublimeText theme and color scheme combination. Over time—quite a lot of time, in many cases—you’ve saved these choices into dozens of preferences dialogs by hitting Apply.
Imagine having to reinstall your operating system due to a hard drive failure or bad update—you’ve just lost all of those preferences.
Now, imagine downloading a repository with git and running a single command to put all those preferences back in place. Instead of taking hours to reconfigure all your favorite apps, a script will do the same in seconds.
That’s the power of dotfiles. And, best of all, they’re just waiting for you to start using them.
Where do I get started?
There are countless ways to configure each file, and just about as many methodologies for deploying dotfiles to a new machine. We’ll focus on the fundamentals:
- Establishing a dotfiles repository for the first time
- Creating a few dotfiles
- Making and saving changes
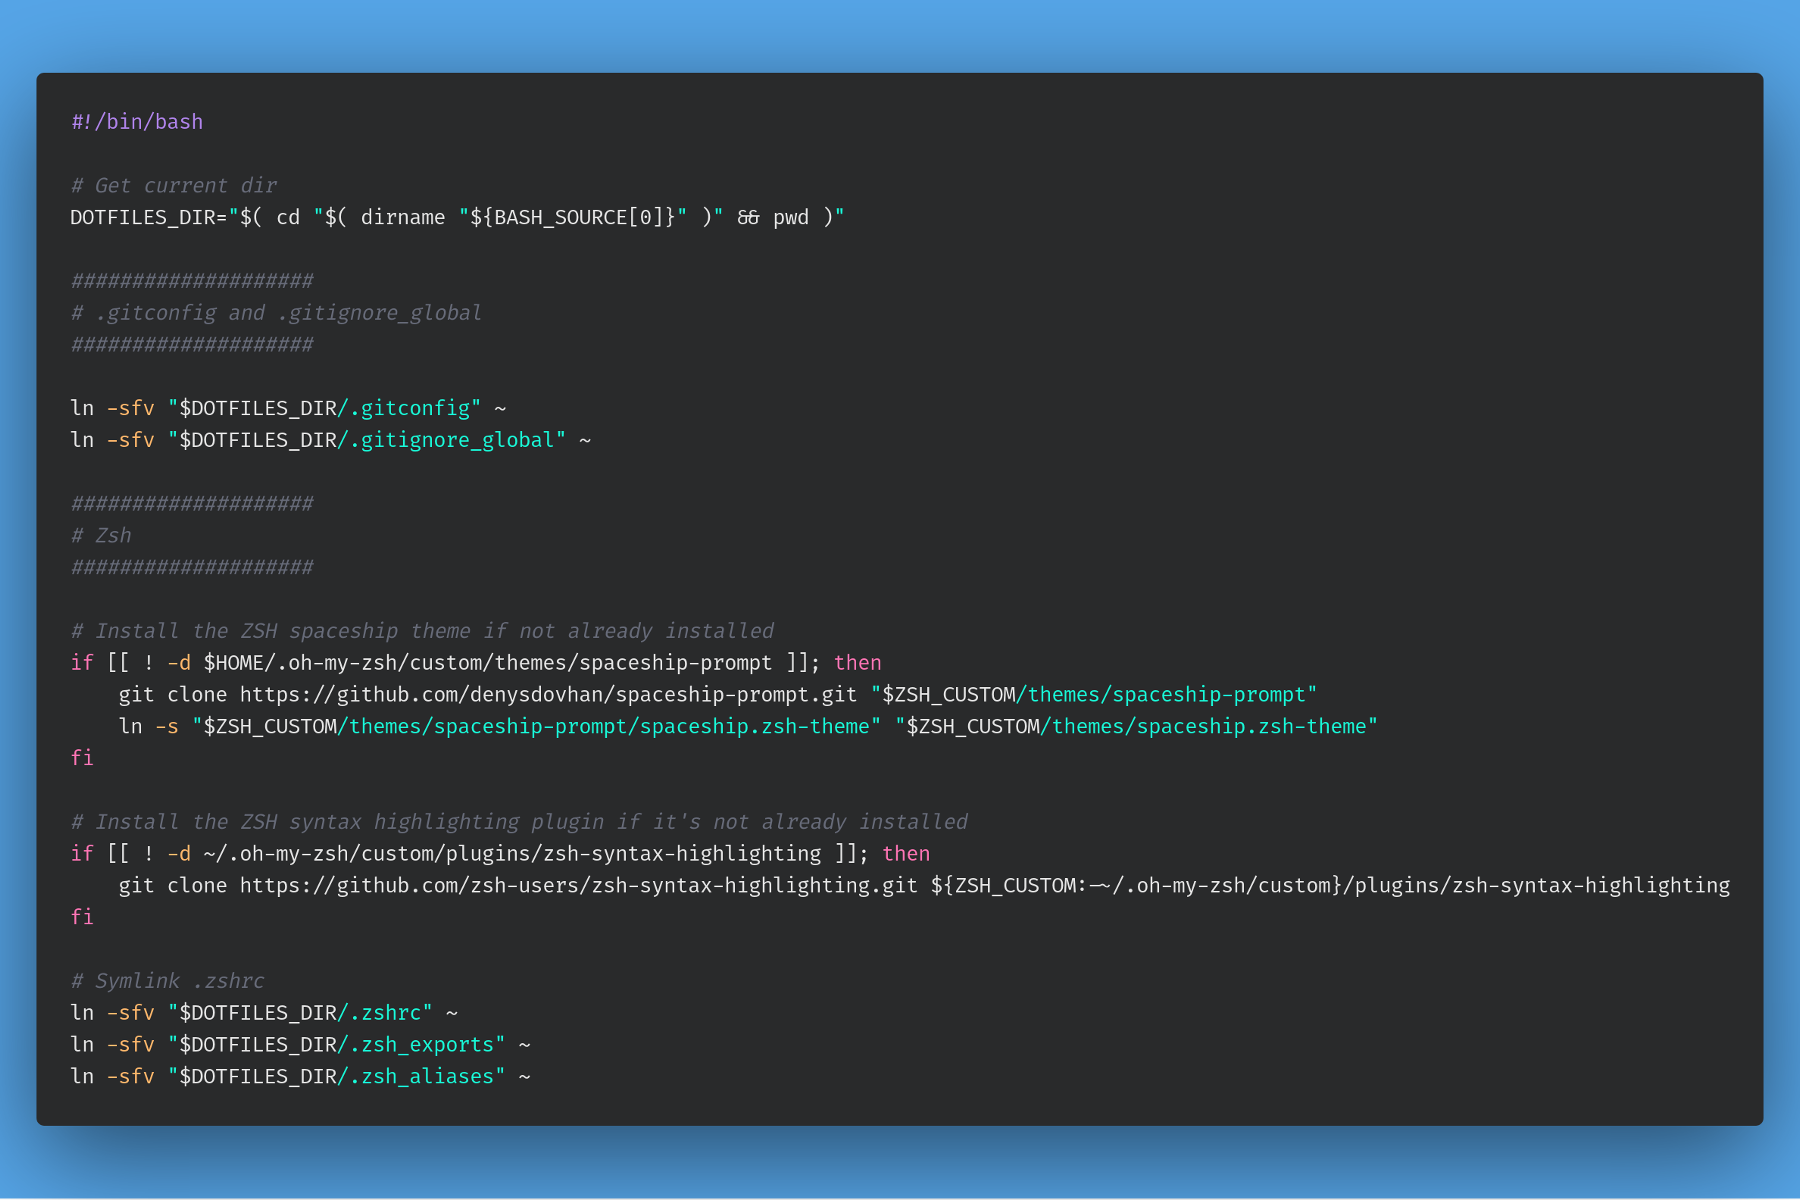
- Deploying dotfiles (with a Bash script)
Instead of telling you exactly how to set your dotfiles up, I want to focus on the fundamentals and give you some inspiration on how you want to establish your own repository.
An important note: You can find plenty of dotfile repositories online, but you should not merely clone one and deploy it to your machine—things could break, and you won’t know how to fix it. Or, the new environment will be so foreign that you can’t get around. Instead, explore these repositories for inspiration and bits of configuration magic that you can adapt to your dotfiles.
Another important note: Once we get started, we’ll be overwriting existing configuration files with logical (and functioning!) defaults. Be careful with what you overwrite, and, better yet, create backups!
Step 1. Establishing a dotfiles repository for the first time
Before you can start working with your own dotfiles repository, you need to create the directory and initialize it as a Git repository. You can name your folder anything you’d like, and put it wherever it’s convenient for you, but I think placing the .dotfiles directory in your home folder makes a lot of sense.
$ mkdir ~/.dotfiles
$ cd ~/.dotfiles
$ git init
You’re now set up with a local Git repository that will version control any changes.
For your repository to be shareable and accessible from multiple computers, you’ll want to connect this local repository to GitHub.
- Log into GitHub.
- Click on the plus sign
+in the upper right-hand corner, and thenNew repository. - Choose a name, add a description. Skip initializing a README, adding a
.gitignorefile, and choosing a license for now. - Hit
Create repository.
You should now have an empty repository on GitHub as well. Now to connect the
by subscribing to our newsletter.
A note about tutorials: We encourage our users to try out tutorials, but they aren't fully supported by our team—we can't always provide support when things go wrong. Be sure to check which OS and version it was tested with before you proceed.
If you want a fully managed experience, with dedicated support for any application you might want to run, contact us for more information.