
If you’re reading this article, there’s a big chance you’ve chosen one of our 1 Click Applications (aka 1CA), having your preferred application ready to be used as soon as your server is up and running.
Our tech engineers at SSD Nodes strived to save you time and effort, preparing the most demanded applications, while making sure you get the most updated version of your preferred app, after having been fully tested and deployed to fit your basic needs.
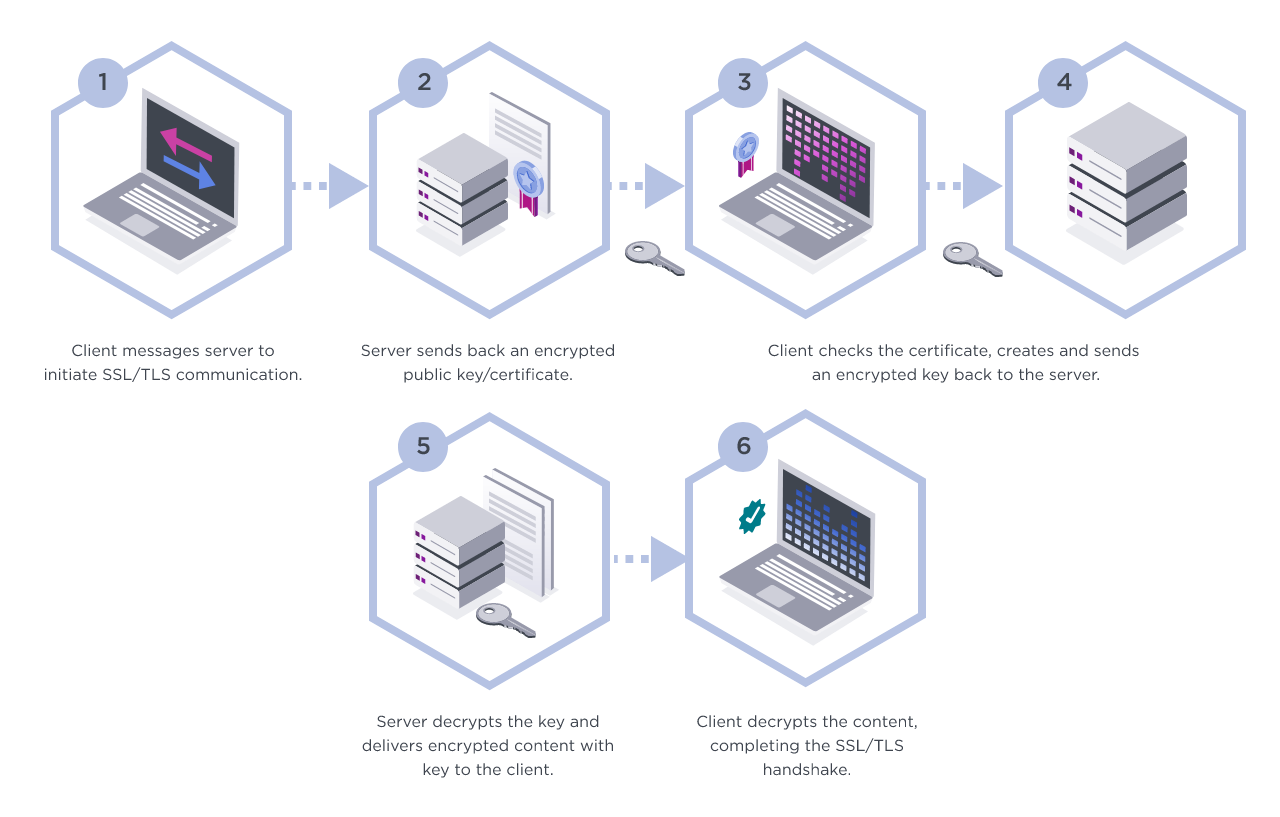
And to make them even more secure, all our 1CAs are installed with an active HTTPS self-signed certificate that will secure your website and protect your customers’ online transactions, making sure their sensitive information, such as their credit card number and personal information are being securely transmitted.
In this article
- Understanding our 1CAs built-in Self-Signed Certificates
- Transforming your Self-Signed to a CA certificate
- Adding a hostname to your server? (Changing IP to hostname)
In case you landed on this article, and you didn’t purchase your server yet, along with your preferred 1CA installed, just visit our site, choose the server’s specifications that fit your needs, along with any of the 1 Click- Applications we offer (WordPress, Zabbix, phpMyAdmin, Webmin, Nextcloud, LAMP, LEMP, Grafana, MongoDB to name a few), complete your checkout, and in a couple of minutes, our building algorithms will make it ready to use!
Understanding built-in Self-Signed Certificates
Please check our article that explains how our built-in self-signed certificates create safer experiences for your customers, build more trust and improve conversions, protecting both customers and internal data.
Moreover, we explain pros and cons of self-signed vs CA certificates; the latter are created, signed, and issued by a third party called a certificate authority (CA).
Check more details in our blog article: What are SSL Server Certificates and how do they protect my website?
Trying out your certificate
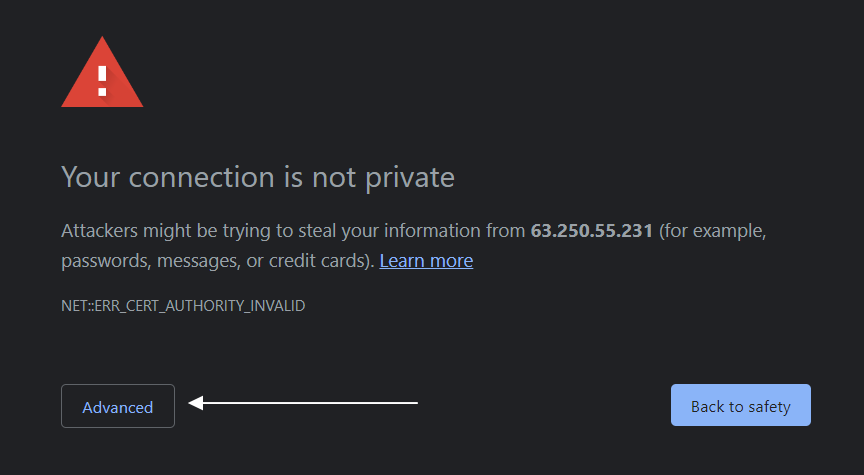
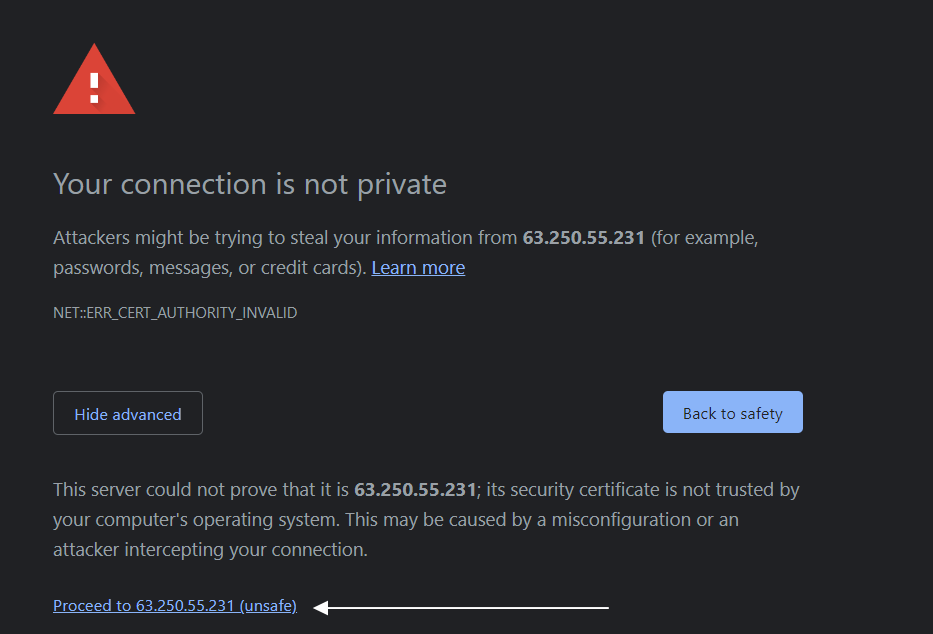
- Load your site in a browser by prefixing https:// to your website address. You would get a notification message, which is normal for a self-signed certificate.
- The browser is just warning you that it can’t verify the identity of the server, since the certificate is not signed by any of its known certificate authorities.
- Click “ Advanced” or “More information” depending on the browser, and choose to proceed. Below is an example from Google Chrome.
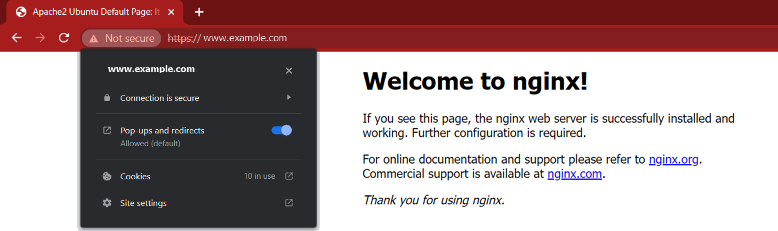
After you do so, your browser will load your application’s welcome page, but with a noticeable symbol in front of your URL (aka website address).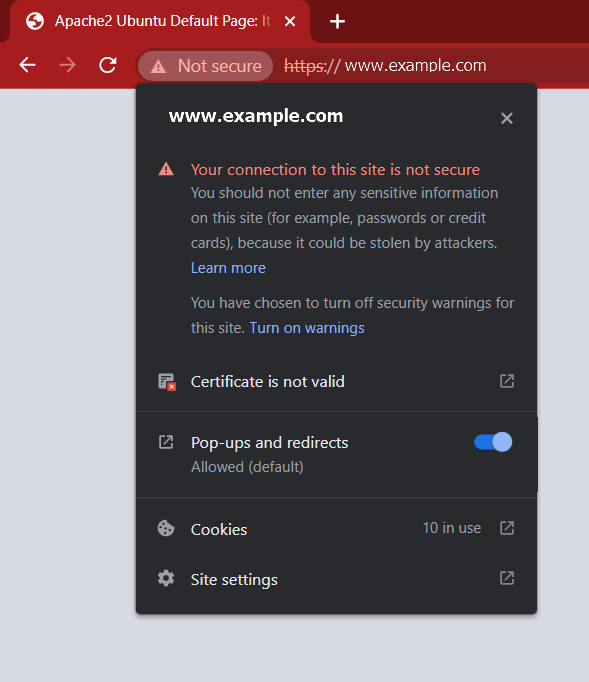
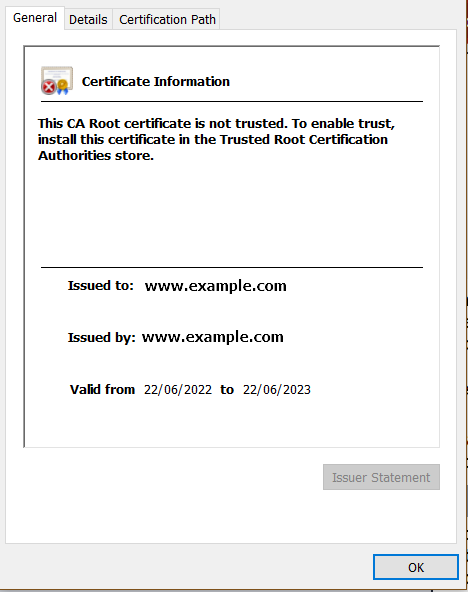
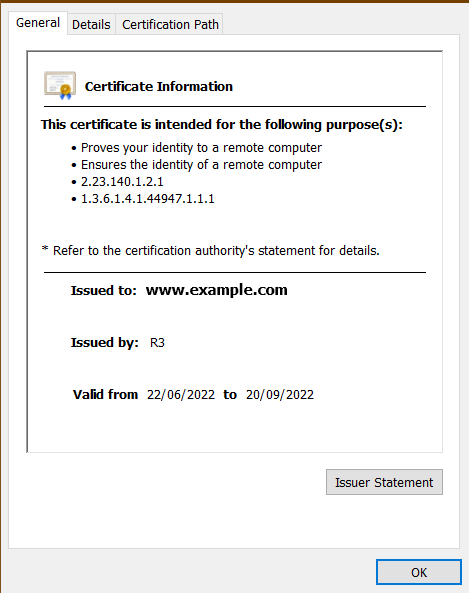
In the above pop-up, click on “Certificate is not valid” for more details on the self-signed certificate.
Transforming your Self-Signed to a CA certificate
CA certificates can either be procured from Let's Encrypt or from other CA authorities.
Please check our special article discussing differences between Let's Encrypt & other CA-issued certificates, along with the essential information on how to procure both of these types.
After you procure your certificate (let’s encrypt or other), please refer to the below, which describes installing the CA certificate on your web server

APACHE WEB SERVER
- Edit apache’s default configuration file
nano /etc/apache2/sites-enabled/000-default.conf
- Replace the key and the certificate paths to the new values (highlighted in yellow in the below code).
<VirtualHost *:80>
        Define servername www.example.com
        ServerName ${SERVERNAME}
        RewriteEngine on
        RewriteRule ^/.*$ https://\${SERVERNAME}%{SCRIPT_FILENAME}?%{QUERY_STRING} [R=301]
        ErrorLog ${APACHE_LOG_DIR}/error.log
        CustomLog ${APACHE_LOG_DIR}/access.log combined
</VirtualHost>
<VirtualHost *:443>
        SSLEngine On
        SSLCertificateFile /etc/letsencrypt/live/www.example.com/fullchain.pem
        SSLCertificateKeyFile /etc/letsencrypt/live/www.example.com/privkey.pem
        ServerName ${SERVERNAME}
        DocumentRoot /var/www/html
        ErrorLog ${APACHE_LOG_DIR}/error.log
        CustomLog ${APACHE_LOG_DIR}/access.log combined
</VirtualHost>
- Restart Apache
sudo systemctl restart apache2
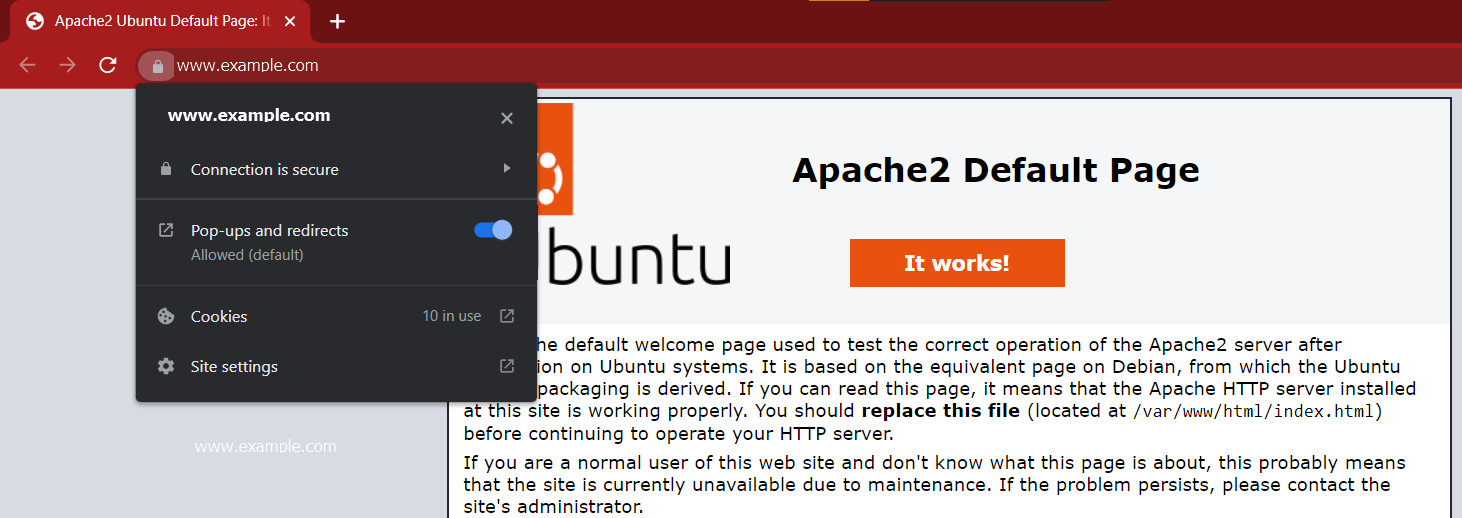
- Reload your browser and you will notice a secured padlock with a valid certificate message as follows. Below is an example from Google Chrome.

NGINX WEB SERVER
- Edit Nginx’s default configuration file
nano /etc/nginx/sites-enabled/default
- Replace the key and the certificate paths to the new values (highlighted in yellow in the below code).
server {
   listen 80;
   listen [::]:80;
   server_name www.example.com;
   access_log off;
   location / {
         rewrite ^ https://$host$request_uri? permanent;
   }
}

server {
    listen 443 ssl;
    listen [::]:443 ssl;
    server_name www.example.com;
    root /var/www/html;
    index index.php index.html index.htm index.nginx-debian.html;
    autoindex off;
    ssl_certificate /etc/letsencrypt/live/www.example.com/fullchain.pem;
    ssl_certificate_key /etc/letsencrypt/live/www.example.com/privkey.pem;
    ssl_protocols TLSv1 TLSv1.1 TLSv1.2;
    ssl_ciphers HIGH:!aNULL:!MD5;

    location ~ \.php$ {
         include snippets/fastcgi-php.conf;
         fastcgi_pass unix:/var/run/php/php-fpm.sock;
         fastcgi_param SCRIPT_FILENAME $document_root$fastcgi_script_name;
         include fastcgi_params;
    }
}
- Restart Nginx
sudo systemctl restart nginx
- Reload your browser and you will notice a secured padlock with a valid certificate message as follows:

COMMON PARTS FOR BOTH APACHE & NGINX
In the above pop-up, click on “Certificate is secure” for more details on the CA certificate.
 Congrats!
Your website has become CA certified and you can securely welcome any online transactions, paid subscriptions like eCommerce websites, memberships or charity and online fundraising.
Adding a hostname to your server? (Changing IP to hostname)
In this section, we will explain how to add a server name to your server, in the two most popular web servers: Apache and Nginx.
After procuring the domain name from SSD Nodes or others (Example: example.com), you need to add a hostname mapping to your server’s IP (Example: www.example.com → 192.0.0.1)
APACHE WEB SERVER
- Edit Apache’s default configuration file
nano /etc/apache2/sites-enabled/000-default.conf
For the moment, you will see that the “servername” attribute is the IP address automatically assigned to you. As an example:
<VirtualHost *:80>
        Define servername 192.0.0.1
        ServerName ${SERVERNAME}
        RewriteEngine on
        RewriteRule ^/.*$ https://\${SERVERNAME}%{SCRIPT_FILENAME}?%{QUERY_STRING} [R=301]
        ErrorLog ${APACHE_LOG_DIR}/error.log
        CustomLog ${APACHE_LOG_DIR}/access.log combined
</VirtualHost>
<VirtualHost *:443>
        SSLEngine On
        SSLCertificateFile /etc/ssl/certs/apache-selfsigned.pem
        SSLCertificateKeyFile /etc/ssl/private/apache-selfsigned.key
        ServerName ${SERVERNAME}
        DocumentRoot /var/www/html
        ErrorLog ${APACHE_LOG_DIR}/error.log
        CustomLog ${APACHE_LOG_DIR}/access.log combined
</VirtualHost>
- Replace the existing IP with your domain name, which rights you would have purchased earlier, from a registrar entity (like GoDaddy, Namecheap, Network Solutions, etc.) by replacing the yellow highlighted part below.
<VirtualHost *:80>
        Define servername www.example.com
        ServerName ${SERVERNAME}
        RewriteEngine on
        RewriteRule ^/.*$ https://\${SERVERNAME}%{SCRIPT_FILENAME}?%{QUERY_STRING} [R=301]
        ErrorLog ${APACHE_LOG_DIR}/error.log
        CustomLog ${APACHE_LOG_DIR}/access.log combined
</VirtualHost>
<VirtualHost *:443>
        SSLEngine On
        SSLCertificateFile /etc/ssl/certs/apache-selfsigned.pem
        SSLCertificateKeyFile /etc/ssl/private/apache-selfsigned.key
        ServerName ${SERVERNAME}
        DocumentRoot /var/www/html
        ErrorLog ${APACHE_LOG_DIR}/error.log
        CustomLog ${APACHE_LOG_DIR}/access.log combined
</VirtualHost>
- Enable SSL and RewriteEngine modules on Apache
sudo a2enmod ssl rewrite
- Test for configuration errors
sudo apache2ctl configtest
The below output means you can safely reload Apache, otherwise, you will get a very specific description pointing out the error you have to fix.
Syntax OK
- Restart Apache
sudo systemctl restart apache2
Testing it
Open your preferred browser, and type your website’s domain name along with the https prefix.
Example: https://www.example.com, then tap “Enter”, and you should notice that your site will load its default home page, while preserving your domain name in the URL. Example: https://www.example.com/landingpages/index.html
NGINX WEB SERVER
- Edit Nginx’s default configuration file
nano /etc/nginx/sites-enabled/default
For the moment, you will see that the “server_name” attribute is the IP address automatically assigned to you. As an example:
server {
    listen 80;
    listen [::]:80;
    server_name 192.0.0.1;
    access_log off;
    location / {
        rewrite ^ https://$host$request_uri? permanent;
    }
}

server {
    listen 443 ssl;
    listen [::]:443 ssl;
    server_name 192.0.0.1;
    root /var/www/html;
    index index.php index.html index.htm index.nginx-debian.html;
    autoindex off;
    ssl_certificate /etc/ssl/certs/apache-selfsigned.pem;
    ssl_certificate_key /etc/ssl/private/apache-selfsigned.key;
    ssl_protocols TLSv1 TLSv1.1 TLSv1.2;
    ssl_ciphers HIGH:!aNULL:!MD5;

    location ~ \.php$ {
         include snippets/fastcgi-php.conf;
         fastcgi_pass unix:/var/run/php/php-fpm.sock;
         fastcgi_param SCRIPT_FILENAME $document_root$fastcgi_script_name;
         include fastcgi_params;
    }
}
- Replace the existing IP with your domain name, which rights you would have purchased earlier, from a registrar entity (like GoDaddy, Namecheap, Network Solutions, etc.) by replacing the yellow highlighted part below.
server {
    listen 80;
    listen [::]:80;
    server_name www.example.com;
    access_log off;
    location / {
        rewrite ^ https://$host$request_uri? permanent;
    }
}

server {
    listen 443 ssl;
    listen [::]:443 ssl;
    server_name www.example.com;
    autoindex off;
    ssl_certificate /etc/ssl/certs/apache-selfsigned.pem;
    ssl_certificate_key /etc/ssl/private/apache-selfsigned.key;
    ssl_protocols TLSv1 TLSv1.1 TLSv1.2;
    ssl_ciphers HIGH:!aNULL:!MD5;

    location ~ \.php$ {
         include snippets/fastcgi-php.conf;
         fastcgi_pass unix:/var/run/php/php-fpm.sock;
         fastcgi_param SCRIPT_FILENAME $document_root$fastcgi_script_name;
         include fastcgi_params;
    }
}
- Restart Nginx
sudo systemctl restart nginx
Testing it
Open your preferred browser, and type your website’s domain name along with the https prefix.
Example: https://www.example.com, then tap “Enter”, and you should notice that your site will load its default home page, while preserving your domain name in the URL. Example: https://www.example.com/landingpages/index.html
A note about tutorials: We encourage our users to try out tutorials, but they aren't fully supported by our team—we can't always provide support when things go wrong. Be sure to check which OS and version it was tested with before you proceed.
If you want a fully managed experience, with dedicated support for any application you might want to run, contact us for more information.