
phpMyAdmin is a free software tool written in PHP that allows you to manage MySQL via a Web interface. phpMyAdmin supports both MySQL and MariaDB. With the phpMyAdmin web interface, you can manage databases, tables, columns, relations, indexes, users, permissions, etc. Additionally, it also gives you the ability to directly execute SQL statements for more complex operations.
Prerequisites
- Basic knowledge of the Linux command line.
- A Debian 11 server with a non-root user with
sudoprivileges. You can get affordable, and powerful Debian servers from our website, and you can check out our How to access your server using SSH guide to learn how to access your server and create asudouser. - The LAMP stack (Linux, Apache, MySQL, and PHP) installed on your server. Use our Installing LAMP on Ubuntu 22.04 LTS guide to set it up.
Note: You can use our LAMP 1-Click App to set up LAMP automatically when creating a server. Just visit our website, choose a server, and while prompted to choose the operating system, choose LAMP from the dropdown menu, complete your checkout, and in a couple of minutes our algorithms will take care of all the complex technicalities for you.
- A TLS/SSL certificate, because phpMyAdmin can access sensitive information about your infrastructure, and an unsecure HTTP connection will make your server extremely vulnerable.
Step 1: Updating the Package Cache and Installing Nano
Start by updating the packages in the package manager cache to the latest available versions using the following command:
sudo apt updateNext install the Nano editor which you'll later use in this article:
sudo apt -y install nanoStep 2 — Installing phpMyAdmin
Before you install phpMyAdmin, you may want to check whether you can access the MySQL command line interface using the root password and normal authentication. To do this, run the following command:
sudo mysqlIf you get an error that contains Access denied for user 'root', this means that the default authentication method has changed, and connecting to MySQL requires a password for the root account. To solve this issue, use the following command to connect to MySQL using the root user and a password:
mysql -u root -pYou'll be asked for your MySQL root password, enter it and then press Enter.
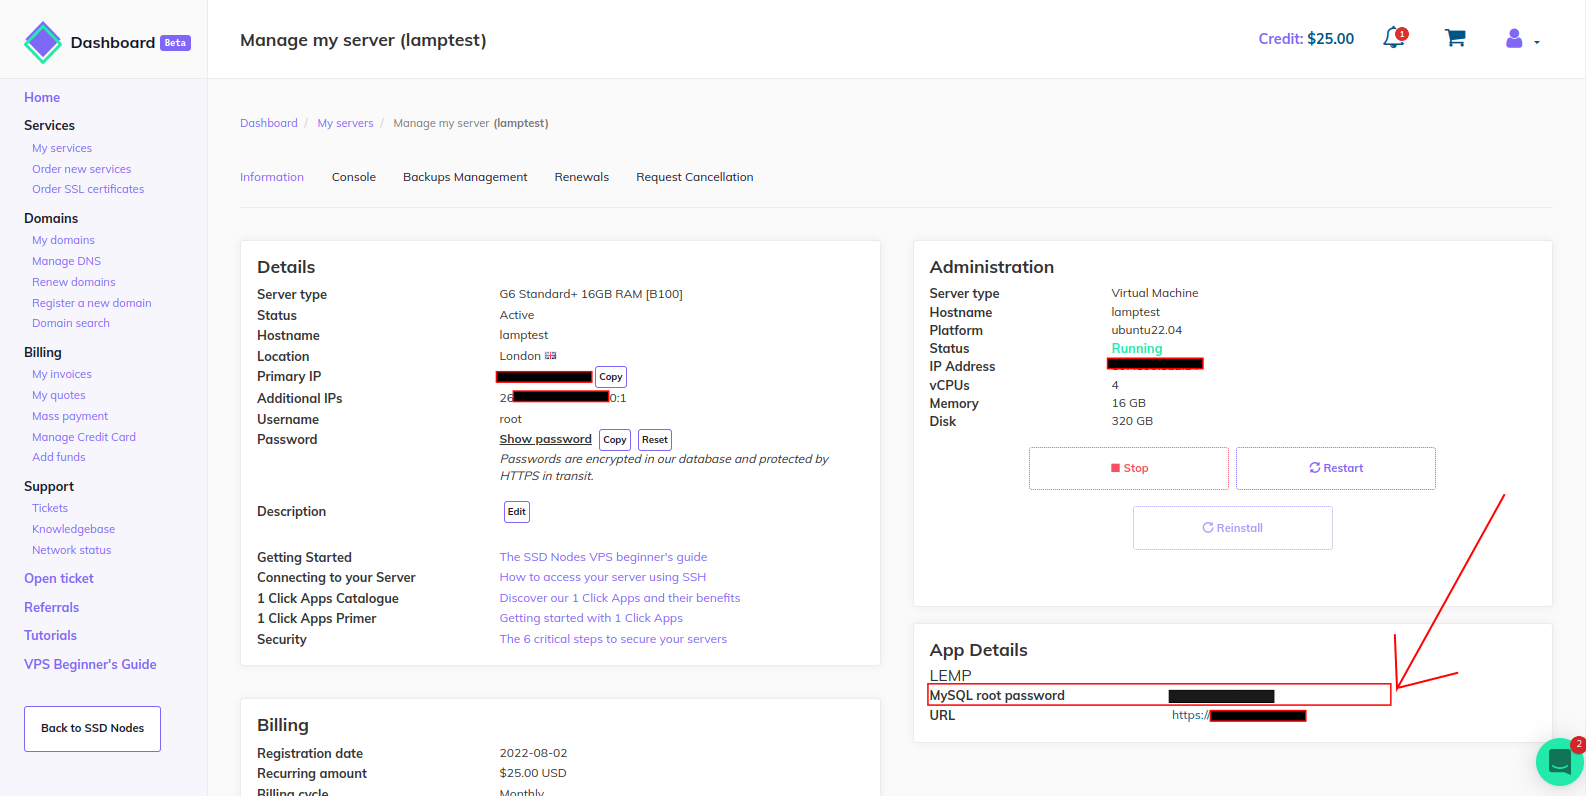
Note: If you've installed the LAMP stack using our 1-Click App, you'll find your MySQL root password in the App Details widget on your SSDNodes Dashboard. As demonstrated in the following image:
Once the MySQL prompt opens, temporarily remove the root password. You will later run mysql_secure_installation to secure your MySQL installation once phpMyAdmin is installed.
SET PASSWORD FOR root@localhost=PASSWORD('');Next, exit the MySQL interface:
exit;To install phpMyAdmin, you also need to install some PHP extensions needed for it to properly work. Use the following command to install phpMyAdmin and its dependencies:
sudo apt install phpmyadmin php-mbstring php-zip php-gd php-json php-curlHere you install phpmyadmin and the following packages:
php-mbstring: A package that provides the MBSTRING module for PHP, which is used to manage non-ASCII strings.php-zip: Provides a Zip module for PHP. Zip is a tool that is used to archive and compress files.php-gd: Provides a GD module for PHP. The GD library is a library that offers graphics drawing tools to manage image data.php-json: Provides PHP with support for JSON serialization.php-curl: Provides a CURL module for PHP. CURL is used in command lines and scripts to transfer data through URLs.
Some of the dependencies above may already be installed on your server if you followed our
by subscribing to our newsletter.