
Most people have installed Docker on their workstations or their VPS, but not many have explored its full potential. Maybe you’ve used Docker to host your website or blog, or perhaps you use it on your local machine to play around with applications others have written. Maybe working with Docker images seems like a stretch, and the extent of your Docker knowledge is the 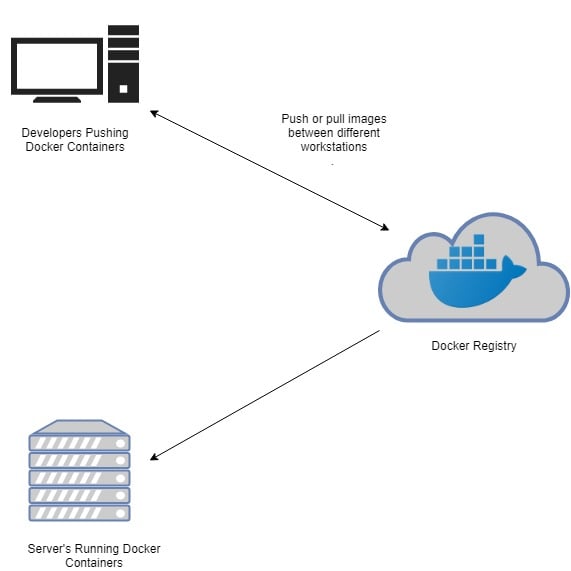 Layers are an essential substructure of a Docker image. Without the concept of layers, creating a Docker image would involve creating everything, from C libraries to core dependencies like language support for your application itself, which could then depend on PHP, Node.js, etc.
But, thanks to layers, we don’t have to reinvent the wheel every time. We could use pre-existing images of, say, Ubuntu or Alpine Linux, and layer our application on top of it. This is the most common way of creating Docker images, and this is what we’ll learn in this post.
Layers are an essential substructure of a Docker image. Without the concept of layers, creating a Docker image would involve creating everything, from C libraries to core dependencies like language support for your application itself, which could then depend on PHP, Node.js, etc.
But, thanks to layers, we don’t have to reinvent the wheel every time. We could use pre-existing images of, say, Ubuntu or Alpine Linux, and layer our application on top of it. This is the most common way of creating Docker images, and this is what we’ll learn in this post.
docker pull, docker run and docker start commands.
If that’s true, but you want to do more, you’ve come to the right place! In this post, we’ll learn how applications like an Apache web server or the Python runtime are containerized, and how you can create Docker images/containers for your own projects as well.
Prerequisites
- Docker running on your local computer Docker installed on your VPS—for information about how to install Docker, check out our getting started with Docker tutorial. An account wither Docker Hub or any other public/private Docker registry A fundamental knowledge about docker and a few standard commands
Docker images, containers, and layers
Let’s begin with the various states of a Dockerized application. When we build a Docker image for our project, the image itself is just a blob of data (like a binary) which you can push to a Docker registry, pulled into a different computer, and then used to create identical containers. When you run a Docker container, the Docker engine manages it, gives it resources, includes it within the Docker filesystem, and allocates an IP address to it. The container is the image manifesting itself as a running application, and the Docker engine allows you to start a container, stop it, or resume it—exactly like when you run a virtual machine.
Layers are an essential substructure of a Docker image. Without the concept of layers, creating a Docker image would involve creating everything, from C libraries to core dependencies like language support for your application itself, which could then depend on PHP, Node.js, etc.
But, thanks to layers, we don’t have to reinvent the wheel every time. We could use pre-existing images of, say, Ubuntu or Alpine Linux, and layer our application on top of it. This is the most common way of creating Docker images, and this is what we’ll learn in this post.
Containerizing a Node.js application
Let’s try to create a container that runs a simple HTTP server written in Node. Create a folder in your local workstationmkdir ~/sampleapp. Within this folder, let’s create two text files: app.js and Dockerfile. The details of app.js file are not that important, but you can glean some of its workings via the comments included.
const http = require("http");

http.createServer(function (request, response) {
   // Send the HTTP header
   // HTTP Status: 200 : OK
   // Content Type: text/plain
   response.writeHead(200, {'Content-Type': 'text/plain'});

   // Send the response body as "Hello World"
   response.end('Hello,
Continue reading this article
by subscribing to our newsletter.
Subscribe nowby subscribing to our newsletter.
A note about tutorials: We encourage our users to try out tutorials, but they aren't fully supported by our team—we can't always provide support when things go wrong. Be sure to check which OS and version it was tested with before you proceed.
If you want a fully managed experience, with dedicated support for any application you might want to run, contact us for more information.